(800) 626-1267

Does Your State Have A Bad Bug Problem In Spring?

It’s no secret that many states have a bug problem in spring. After all, insects usually die off during the winter and increase in number during the springtime. As such, HOAs must watch out for bug infestations in their common areas during the season.


Bug Problem in Spring: The Buggiest States

According to search data, the pesky bug problem in spring is more prevalent in certain states. Let’s examine which states have the most online monthly searches regarding pest control.

  • California. Each month, the residents of California log roughly 47,000 searches for pest control. The predominant insect is bed bugs, with over 17,000 searches. Meanwhile, termites follow closely behind with 10,000 searches, while ants generate 8,000.
  • Texas. Texas logs around 42,000 searches related to pests. Like California, bed bugs are the most concerning as residents look for solutions 15,000 times monthly. In second place are termites, with over 9,000 searches. Meanwhile, ants have become somewhat problematic, with 6,000 monthly searches.
  • Florida. The Sunshine State sees over 33,000 searches a month for pests. However, bed bugs only account for 8,000 searches, unlike the previous states. Termites top off at 12,000 searches, while ants get around 4,000 searches monthly.
  • New York. The residents of New York log 23,000 searches on pests. Like California and Texas, bed bugs are the predominant concern with 8,000 searches. Ants come in second with around 4,700 searches. Finally, there are over 3,000 termite-related queries.
  • Pennsylvania. There are approximately 16,000 queries in Pennsylvania. Bed bugs are in first place with 5,600 searches. After bed bugs, ants have roughly 4,300 pest-related searches. Lastly, termite searches account for 2,500 of those queries.
  • Illinois. Over 15,000 pest-related monthly searches are done in Illinois. Again, bed bugs are the highlight, with roughly 7,000 searches. Ants come at 3,600 searches, while termites generate 1,600 queries.
  • Georgia. The state of Georgia generates roughly 14,000 monthly queries for pest concerns. Like most other states, bed bugs are the primary concern, with over 6,200 searches. They’re followed by termites and ants at 2,500 and 2,100 queries, respectively.


The States Each Bug Bugs the Most

Which states do certain insects bother the most? Let’s examine which states are most concerned about bed bugs, termites, mosquitoes, etc.

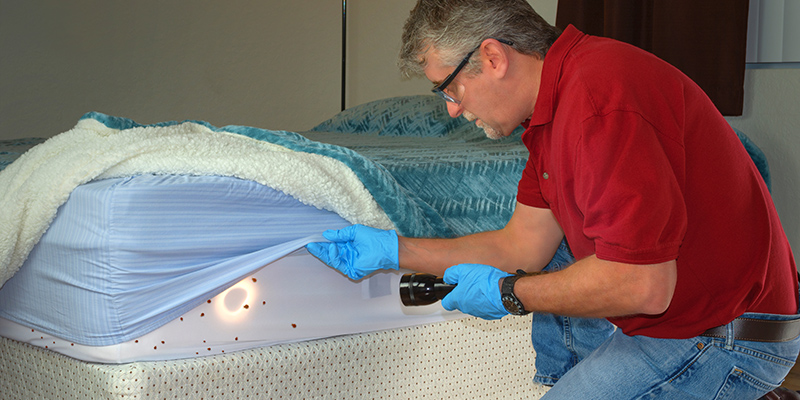
  • Bed Bugs. These pesky insects are causing the most sleepless nights in California and Texas. They’re a big concern because they cause itching and can travel anywhere by someone who picks them up.
  • Termites. It’s looking like Florida, California, and Texas have the biggest problems with termites. Florida is humid, California has many wooden structures, and Texas has a diverse climate. Termite bites also carry the risk of infection.
  • Mosquitoes. Florida, Texas, and California take the lead regarding mosquito problems. Their climates create a perfect environment for mosquitoes. Moreover, Florida has a lot of standing water in the Chain O’Lakes and the Everglades. Mosquitoes bring many diseases, including Dengue, Zika, and Malaria.
  • Ticks. The most ticked-off states are Texas, California, and New York. They have their large outdoor areas, warm climates, and varied ecosystems to thank for this. Ticks carry and transmit diseases like Tularemia and Lyme Disease.
  • Spiders. These multi-legged creatures are most concerning in California, Texas, and Florida. Their climates are humid, warm, and mild, perfect for various spider species. Spider bites are toxic, causing skin lesions and systemic illnesses.
  • Cockroaches. Roaches are unwelcome, mainly in California, Texas, and New York. They have bustling cities and perfect climates with just the proper humidity to welcome cockroaches. Roaches can cause salmonella, E. coli, and urinary tract infections.
  • Ants. These hard-working insects are the most problematic in California, Texas, and New York. They’re pervasive and come in all kinds of species. Most people also don’t know that ants can transmit food-borne disease organisms, causing salmonella, E. coli, and Shigella.
  • Wasps. California, Texas, and Washington are the most annoyed by wasps. Their stings cause allergic reactions and can be fatal. Along with hornets and bees, these pesky insects account for 72 deaths a year.

Bed bugs are the peskiest pest most Americans want gone. They generate a whopping 154,240 queries monthly. Meanwhile, ants and termites pose a significant concern as they are prolific and damaging to homes.


Dealing With a Bug Problem in Spring for HOAs

bug problem in springHomeowners associations are generally in charge of common area maintenance.

Depending on state law and the governing documents, this may also include pest control. This is true whether the association is in charge of a single-family home, townhouse, or condominium community. However, it can be hard to manage the pest population when you don’t know which ones to target.

Therefore, homeowners associations should use the above information to know what to focus on. If your HOA is in a state that has the biggest bed bug problem, then concentrate on bed bug control might be the best idea. Meanwhile, if mosquitoes are the most prolific in your area, using anti-mosquito pest control methods might be wise.

For many HOAs, this means hiring a vendor familiar with the target insect. HOA boards must also learn more about the bug in question. This can help them re-evaluate their common areas to control the infestation. For instance, do the insects breed on still water? Consider covering the community pool when it’s not in use. Do the insects love certain types of flowers or plants? Consider replanting or replacing the plants in your community garden with other plant species.


Working With Homeowners

Homeowners associations are often only in charge of maintaining common areas. Hence, individual residents are responsible for pest control in their own homes. They’re also typically in charge of controlling pests in exclusive-use common areas.

However, pests don’t usually live in a vacuum. If a specific pest infests one home, they can easily migrate to other homes or the common areas. As a result, it’s best to educate the community about the habits of these pests, their dangers, how to keep them away, and how to exterminate them. The HOA can also help by letting them know who to call to address the issue.


Be Prepared This Season

It’s not uncommon for HOAs to find a bug problem in spring. HOA boards must examine the data and understand which pests will likely pose the biggest problem. Afterward, it’s only a matter of contacting the right vendors to do the job.

Do you need help managing a planned community? Condo Manager is the best tool around for self-managed communities and HOA management companies. Contact us online or call us at (800) 626-1267 to request a demo!


RELATED ARTICLES:


10 Thanksgiving Activities For The Community

Thanksgiving activities for the community are a fantastic way for neighborhoods to celebrate the national holiday together. They’re fun and can foster closer bonds within the community. Moreover, they’re sure to be memorable for everyone involved.


10 Best Thanksgiving Activities for the Community

Thanksgiving is the most popular event in the United States. Families have gathered together to celebrate the holiday since the 1860s. While the festivities usually involve a traditional Thanksgiving dinner with turkey and Thanksgiving desserts, the holiday has evolved.

Nowadays, even entire communities celebrate the holiday together with food and activities. What are some Thanksgiving activities for the community to enjoy? Here are a few good ideas your neighborhood can try out.


1. Thanksgiving Feast

Everyone loves food. What better way to foster close community relationships than with a grand feast? A feast is exactly in the spirit of the holiday. It’s relatively easy to put together, too. The community’s residents only need to decide on a menu. To make things easier, the feast can be a potluck where everyone pitches in by bringing food.

The only tricky part is preparing a venue for the feast. However, communities with clubhouses or event spaces will have no problem preparing a venue. Meanwhile, other communities can reserve a local church or nearby high school gym. Some may even be able to collaborate with local restaurants.


2. Community Football

thanksgiving Community FootballThanksgiving and football are two classic American events. Why not put them together and have a community football gathering? It’s perfect for neighborhoods with a local NFL team or football college.

This may be a bit trickier to set up, considering the venue and equipment aren’t always easily accessible. However, if possible, it’s a good idea to encourage community members to enter their team into a tournament. The community can host the tournament over a weekend. Communities can even have different segments for family, children’s, and mixed-gender teams.


3. Thanksgiving Quiz Night

Exercising your brain is just as important as exercising your body. If not a football tournament, why not consider a Thanksgiving-themed quiz night? All the community needs to do is set up a special HOA committee.

The committee can draft questions about the holiday’s history with the committee set up. They can also dip into Native American history or international holidays with similar or different traditions. The quiz night can have a small entrance fee, with the proceeds donated to charity.


4. Thanksgiving Neighborhood Scavenger Hunt

Hosting a scavenger hunt is perfect for communities with young families. Both adults and kids can enjoy the activity as they receive clues and look for leads throughout the neighborhood. The community can limit the hunt to one or two venues or expand it to the whole community.

Plus, the activity is easy to create. There are dozens of online templates for Thanksgiving scavenger hunts. Communities can also personalize the scavenger hunt according to the neighborhood’s traditions.


5. Turkey Fun Run

It might sound a little silly, but hosting a fun run dressed as turkeys is precisely the kind of kooky activity that can bring people together. Turkey is a big part of the holiday festivities, after all. It’s in line with the theme and good exercise for all the participants, too!

Just plan a 5k fun run route around the community. The turkey trot can start and end on the same spot. To make things more fun, the community can also provide snacks and beverages and put on some music. This way, everyone can enjoy the race.


6. Native American History Festival

The history of Thanksgiving is intertwined with Native American history. That’s why it’s the perfect time to host a Native American history festival for everyone to enjoy. Both kids and their parents can gather together and dive deeper into the past.

Participants can also come in traditional costumes. The community can also put on plays, demonstrations, and talks or lessons. They can even invite people from local drama or theater societies or schools. Just prepare a suitable venue like the neighborhood park or clubhouse.


7. Thanksgiving Food Drive

The holiday is all about giving thanks for the harvest or life. What better way to give thanks than to organize a food drive for the local food bank or homeless shelter? This way, the community can show their thankfulness by giving back.

Encourage the local residents to stock up on food with long shelf lives, like canned goods. People don’t have to give a lot — they can give as they can. The point is to help others in need. It also sets a good example for the neighborhood kids. They’ll know how to give back and make a difference in others’ lives when they grow up.


8. Thanksgiving Community Yard Sale

Thanksgiving is a great time to declutter and host a special community yard sale. It allows people to get rid of items they no longer want or need. Moreover, it helps others find good deals on items they want.

The proceeds of the community yard sale can be given to a local homeless shelter. Alternatively, the community can also donate it to a local charity. This is also a good way to show thankfulness by giving back to people in need.


Thanksgiving Pumpkin Patch
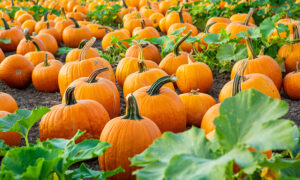
9. Thanksgiving Pumpkin Patch

Pumpkins aren’t limited to Halloween. They’re also a big part of Thanksgiving. The community can celebrate the holiday by partnering with a nearby farm to host a pumpkin patch. They can place the pumpkins around the community park. Residents can walk along the park and choose pumpkins to take home for decoration, carving, or cooking.


10. Thanksgiving Arts and Crafts

Families with young children, in particular, will enjoy this event. The community can host an arts and crafts session with a Thanksgiving theme. All that’s needed are art materials like paper, scissors, crayons, and googly eyes. The participants can make a collage of whatever’s in line with the theme.

Afterward, the participants can display their handiwork around designated public spaces in the neighborhood. They can also take their craft home to decorate the house.


Giving Thanks Together

These Thanksgiving activities for the community are great ways to encourage community involvement. They can also engage the residents and help them get to know their neighbors while celebrating the holiday.


RELATED ARTICLES:


9 Fun Labor Day Activities For Kids

What labor day activities for kids should you conduct as a community? Here are some ways the kids in your homeowners association can take part in labor day festivities.


What Is the Significance of Labor Day for Kids?

How can Labor Day activities benefit a child’s learning and development? Kids will often like labor day because it gives them a break from school. But, it’s important to teach them why we celebrate every first Monday of September. This way, the kids will understand why the holiday is significant. They will learn early on how much American workers have contributed to the country and have a better appreciation for them.

However, teaching them goes beyond simply explaining that it was made for American workers. Kids often learn better through hands-on activities rather than classroom-type sessions or parental explanations. That’s why conducting these activities might be a better approach.

In addition, creating labor day activities for kids is simply a good way to involve the kids in the neighborhood. They can feel a better sense of community as they celebrate the occasion with all the adults in the community. There should even be activities for the elderly so that no one in the neighborhood feels left out.


Fun Labor Day Activities for Kids

What are some good labor day activity ideas? Here are some fun ways to involve the children.


1. Labor Day Scavenger Hunt

Hosting a scavenger hunt is a great idea if you want a more involved labor day for kids activity. The organizers can create one with a labor day theme where kids can make stops at local neighborhood buildings. They can stop at the local police station, fire department, or even school. Kids can find relevant items in red, white, and blue. Everyone is sure to have a fun time no matter the age.


2. Book Reading

labor day activity ideasActivities are great but storytelling can often help kids learn more. This is why simply cuddling with the kids and reading a relevant book can be a good option. It’s a great method to teach younger kids who are not as able to participate in physical games. Of course, choose a book on Labor Day to match the theme.

For this, it’s best to plan ahead. Look at a few relevant books at the local library and check one out before the holiday. You can even bring the kids with you so they can say “thank you” to the librarian and other personnel. Moreover, you can even encourage the little ones to ask about their jobs to get them into the Labor Day spirit.


3. Make Thank-You Letters

Making thank-you letters is one of the best labor day activities for kids at home. They’re simple yet heartfelt and can truly teach them the significance of the holiday. It also intimately involves them in the festivities in a way no game or activity can.

Help your child write a note to a worker they admire. It can be a local policeman, security guard, or even a janitor. Then help them deliver the note personally or by mail.


4. Send Goodies to Workers

There’s no better way to appreciate American workers than by sending them goodies. To involve the kids, you can bake your own goodies or bring them along to the bakery to pick out pastries. Then deliver them to local institutions like the fire station, police department, or post office.


5. Make a Career Mobile

Crafting a career mobile can help kids understand what possible career options they have in the future. It’s also a good way to respect various professions and help them appreciate each type of work.

To do this, you can find photos of American workers online and print them out. You can also involve the kids by cutting out photos of workers from brochures, newspapers, magazines, and other publications. Make a hanging photo mobile or buy one online and help them complete the career mobile.

Afterward, you can ask the kids to think about what they want to be when they grow up. This can help them figure out their dream career early on while celebrating the holiday.


6. Eat Patriotic Snacks

Food can always bring people together — even children. What better way to celebrate the holiday together than to eat patriotic snacks? This can keep your kids full and boost their American pride. Just make some fruit skewers with watermelons, blueberries, banana slices, raspberries, and strawberries. Then dip them in marshmallow cream to add flavor.

If you don’t have enough fruits, you can simply make watermelon popsicles. Just cut up a watermelon into small triangles and stick a popsicle through the skin. Then serve the watermelons on napkins in blue or red.


7. Create Footprint Vehicles

Do you need labor day activities for kindergarten students? If your child is too young, you can simply make arts and crafts at home. You can do this by asking them what vehicles local workers use to do their work. They may choose school buses, firetrucks, police cars, army tanks, or tractors.

Regardless, make it a fun activity and help them use their footprint to create the body of the vehicle. Afterward, help them complete the vehicle with paint, crayons, and stickers. You can even use the final craft as a decoration to commemorate the holiday. But, just remember to follow your neighborhood’s decoration rules to avoid penalties or conflict.


8. Host a Sing-Along With Friends

Labor Day kids sing-alongIf you want to involve your child’s friends, why not host a neighborhood sing-along? You can choose a patriotic or relevant song like The National Anthem, Living in America by James Brown, or 9 to 5 by Dolly Parton. There are many more to choose from.

Prepare a portable speaker and a fake microphone to help the children feel more involved. You can also print out the lyrics or use a projector so everyone can follow along.


9. Spend Time at a Neighborhood Gathering

Hosting a community gathering is one of the best labor day activities for kids that involve the whole community. The whole block can organize a Labor Day party with activities specifically reserved for the kids. Adults can share what their jobs are to inspire the kids.

You can also decorate the neighborhood’s lawns with streamers, balloons, and other ornaments. For food, a classic American BBQ is all it takes to get them into the holiday spirit. You can also bring out roller skates, scooters, and bikes so the kids can play. Finally, you can even have a donation jar ready. The community can donate the proceeds to various American foundations.


A Holiday for All Ages

Labor Day is a holiday for all ages. Parents can always introduce the holiday to their kids through fun and creative ways. They can host activities whether at home or with their neighbors and friends. Homeowners associations can even host official block parties to get everyone involved.

Condo Manager offers software solutions to homeowners associations and HOA management companies. Call us at (800) 626-1267 today or contact us online to get a free demo!


RELATED ARTICLES:

4 Easy And Delicious 4th Of July Dessert Recipes

Preparing a delicious 4th of July dessert is one of the best ways to celebrate Independence Day. After all, there’s no better way to spend the holidays than with good food among friends and family. If you need a little inspiration, check out these Fourth of July dessert recipes.


Delicious 4th of July Dessert Recipes

Many Americans choose to hang up a flag of the country for Independence Day. It’s a great way to showcase your patriotism and celebrate the holiday. Moreover, the practice is protected, so HOAs can’t ask homeowners to remove the American flag completely. However, it’s not the only way you can celebrate the occasion.

Food is another great way to celebrate the holiday. It’s a wonderful way to bond and bring people together. Hence, it’s no surprise that over half of Americans planned to spend Independence Day with a cookout in 2022.

However, even the best 4th of July recipes can feel empty and unfulfilling without dessert. That’s why we highly recommend topping off your family meal with a dessert for July 4th. Check out these 4th of July desserts and see what you like.


1. Key Lime Pie

Key lime pie is one of the best recipes for 4th of July desserts that match the season perfectly. It’s creamy, refreshing, and delicious. Plus, it’s easy to make because there’s no baking involved!


4th of july dessert recipesIngredients:

  • For the pie crust:
    • 12 graham crackers
    • ⅓ cup of brown sugar
    • 6 tbsp. of melted butter
  • For the filling:
    • ¾ cup of heavy cream
    • 1 14-ounce can of sweetened condensed milk
    • 12-ounce cream cheese
    • 2 tsp. freshly grated lime zest
    • ½ cup key lime juice
    • Lime zest and whipped cream, for serving

Directions: 

  1. For the pie crust:
    1. Put the brown sugar and graham crackers in a food processor bowl. Process them finely for one minute. Pour the mixture slowly in melted butter as the processor runs. Process the crumbs until they’re like coarse sand.
    2. Transfer to a deep 9-inch pie plate. Press the crust firmly and evenly to the bottom and sides of the pan with the bottom of a measuring cup. Place the crust in the freezer for 20 minutes.
  2. For the filling:
    1. Use a sand mixer with a whisk attachment to whisk the heavy cream to stiff peaks. Alternatively, you can also use a hand mixer with beater attachments. Then transfer the mixture to another bowl.
    2. Add lime zest, cream cheese, and sweetened condensed milk in the stand mixer bowl. Use a paddle attachment to beat on medium-high speed until smooth for 2 minutes. Scrape down the sides as needed.
    3. Turn the mixer to low speed and add key lime juice slowly. Boost the speed up to medium and mix until it combines. Remove the mixture from the stand mixer and fold the whipped cream gently.
  3. Spoon the filling into the pie crust and make an even layer. Refrigerate the pie for 12 hours.
  4. Serve with whipped cream and lime zest.


2. Pineapple Upside-Down Cake

The Pineapple Upside-Down Cake is one of the healthiest 4th of July cake recipes out there. It’s fruity, fluffy, and screams classic American 4th of July dessert.


Ingredients:

  • Baking spray with flour
  • 1 tbsp. cornstarch
  • 12 maraschino cherries
  • 1 15-ounce can of pineapple slices in juice
  • 3 large eggs, room temperature
  • 1 8-ounce can of pineapple slices in juice
  • 3 cups all-purpose flour
  • 1 ¾ cup unsalted butter, softened and divided
  • 2 cups and 2 tbsp. granulated sugar, divided
  • 1 cup sour cream, room temperature
  • ¾ cup of light brown sugar
  • 1 tsp. baking soda
  • Ice cream, for serving
  • 1 ¼ tsp. kosher salt, divided
  • Whipped cream, for serving
  • 1 ½ tsp. vanilla extract

Directions:

  1. Preheat the oven to 350°. Spray baking spray on a 9×13-inch baking pan—line it with parchment paper.
  2. Drain the pineapples and pat dry. Set the liquid aside. Toss 2 tbsp. of sugar and cornstarch in a bowl with the pineapple. Transfer to a pan and add cherries in the center.
  3. Melt ¾ cup of butter. Mix the sugar and ½ tsp. of salt, simmer for 3 minutes. Pour 3 tbsp. of pineapple juice and whisk until smooth. Then pour the caramel over the pineapples.
  4. Beat 1 cup of butter, 2 cups of sugar, and vanilla in a stand mixer for 2-3 minutes. Add the eggs one by one, beating them after each addition.
  5. Whisk baking soda, baking powder, flour, and ½ tsp. of salt in a bowl. Add it to the butter mixture, alternating with sour cream. Mix and spread the mixture onto the pineapple.
  6. Bake for 50 minutes with foil on top. Cool on a wire rack for 10 minutes without the foil. Invert on a plate and remove the parchment. Cool for 10 minutes, and then slice.
  7. Serve with whipped or ice cream.


3. Strawberry Cobbler

Are you craving fruity desserts for 4th of July? Why not try this strawberry cobbler to start? It’s simple and quick, so you don’t have to take too long to prepare it for dinner. Just make sure to completely thaw and drain your strawberries if you’re using frozen ones.


Fourth of July Strawberry CobblerIngredients:

  • 1 cup whole milk
  • 6 ½ cups strawberries, halved
  • 1 ¼ cup granulated sugar, divided
  • ½ cup salted butter
  • 1 cup self-rising flour
  • 2 tbsp. cornstarch
  • 1 tbsp. fresh lemon juice
  • Vanilla ice cream, for serving

Directions:

  1. Preheat the oven to 350°. Bring out a 10-inch cast iron skillet and add butter. Then heat it in the oven for 5 minutes until the butter melts. Swirl the pan from time to time. Afterward, remove the pan and set it aside.
  2. Whisk 1 cup of sugar, milk, and flour in a medium bowl. Then add the other ¼ cup of sugar and cornstarch and continue whisking. Mix in and stir the lemon juice and strawberries.
  3. Pour the mixture into the cast iron skillet. Spoon the mixture and its juices evenly without stirring.
  4. Prepare a foil-lined baking sheet and place the skillet on top. Place the skillet and baking sheet on the middle rack of the oven and bake until golden brown. This takes about 60 to 75 minutes.
  5. Let the strawberry cobbler cool on a wire rack for 15 minutes. Serve with vanilla ice cream.


4. Strawberry Pretzel Salad

This odd salad is surprisingly one of the most delicious 4th of July jello recipes available. It’s also an almost no-bake dessert so it’s one of the fastest July 4th easy desserts to whip up!


4th of July Strawberry Pretzel SaladIngredients:

  • For the salad crust:
    • 4 cups of pretzel sticks
    • ½ cup of unsalted butter, melted
    • ⅓ cup packed light brown sugar
  • For the cream cheese filling:
    • 1 ½ cup heavy cream
    • 8 ounces of cream cheese, softened
    • 8 ounces of sour cream
    • 1 cup granulated sugar
    • 2 tsp. vanilla extract
  • For the strawberry jello topping:
    • 6 ounces of strawberry-flavored gelatin powder
    • 2 cups of boiling water
    • 1 lb. fresh strawberries, stemmed and sliced

Directions:

  1. For the salad crust:
    1. Preheat the oven to 350° and crush the pretzels. Stir the pretzel crumbs, brown sugar, and butter in a bowl. Press the mixture on a 9×13 baking dish. Bake for 12-14 minutes. Cool the crust on a wire rack for 30 minutes.
  2. For the cream cheese filling:
    1. Beat the heavy cream on medium-high speed for 1 to 2 minutes until the stiff peaks form. Transfer the mixture to a bowl and set aside.
    2. Beat the sugar, cream cheese, sour cream, and vanilla in the bowl you used to beat the cream. Use medium-high speed for 3 minutes. Transfer the mixture to the whipped cream bowl and fold to combine them. Spread the mixture evenly on the pretzel crust. Chill in the fridge for an hour.
  3. For the strawberry jello topping:
    1. Dissolve and mix the gelatin powder and boiling water in a bowl. Stir the strawberries in. Chill the mixture in the fridge with a cover for one hour.
    2. Spoon the strawberry mixture over the cream cheese layer. Chill it until it sets for 2 hours or overnight.
  4. Cut the pretzel salad into squares and serve chilled.


Celebrate the Day With Scrumptious Desserts

Adding a 4th of July dessert to your menu is a great way to enhance your holiday meal. Some of these recipes do take more time to prepare. They’re certainly worth the effort if you want to enjoy scrumptious sweets with your friends and family.


RELATED ARTICLES:


7 Fun Memorial Day Crafts For Kids

Creating Memorial Day crafts is a fun way to introduce kids to the federal holiday. They get to exercise their creative muscles while learning why the holiday is significant. It also starts them young as they learn to honor those who served the country.


Creative Memorial Day Crafts for Kids

Are you looking for fun ideas for Memorial Day crafts? Here are some cool ideas to help kids exercise their creativity.


1. Pompom Flag Painting

Hanging the American flag according to the Flag Code is a great symbol of patriotism. If homeowners follow the rules, the HOA shouldn’t ask them to remove the flag.

With that said, teaching kids the importance of the American flag is a great way to honor Memorial Day. And what better way than to have them create a flag themselves?

Pompom flag painting is one of the best Memorial Day crafts for toddlers. It’s also not that messy, even though they’re using paint.


Supplies: 

  • Blue, red, and white paint
  • 3 Clothespins
  • White paper
  • Small pompoms

Directions: 

  1. Pinching the small pompoms using clothespins.
  2. Dip the pompoms in paint.
  3. Stamp or swipe the different colors of paint on the white paper to create the flag.
  4. Let the red, white, and blue paint dry.
  5. Stamp white on the blue rectangle to create the stars.


2. Popsicle Stick Flags

Making popsicle stick flags is a more challenging (but fun) activity for preschool Memorial Day crafts. Furthermore, these flags are less messy to make than those created through pompom painting.

Kids can also do this with their siblings or friends. Thus, it’s a great way to foster early childhood cooperation and teamwork.

Once finished, homeowners can even display these flags on the front porch. They only need to remember to follow the HOA’s rules on holiday decorations.


Supplies:

  • Popsicle sticks
  • Red, white, and blue paint
  • Glue
  • White paper
  • Scissors

Directions: 

  1. Paint the popsicle sticks in blue, red, and white.
  2. Glue the red and white sticks to create the stripes.
  3. Cut the blue sticks in half.
  4. Glue the blue sticks together to create the blue rectangle.
  5. Cut the white paper into star shapes.
  6. Stick the stars onto the blue rectangle with glue.


3. Popsicle Stick Uncle Sam

If you want ideas for easy Memorial Day crafts, we recommend the popsicle stick Uncle Sam craft. Unlike the American flag, Uncle Sam is easier to make.


Supplies:

  • Blue, red, and white paint
  • Popsicle sticks
  • Glue
  • Pink and white paper
  • Googly eyes
  • Scissors
  • Pencil

Directions: 

  1. Glue six unpainted popsicle sticks together for the face.
  2. Stick one popsicle stick horizontally across the face to create the brim of Uncle Sam’s hat.
  3. Paint the brim with blue paint.
  4. Apply red and white paint on the upper half of the popsicle sticks to create a striped hat.
  5. Stick two googly eyes below the brim to make the eyes.
  6. Trace your hand on two pieces of white paper.
  7. Cut the two traced hands.
  8. Stick the cut out hands on the bottom of Uncle Sam’s face for the beard.
  9. Cut a small circle from the pink paper to make the nose.
  10. Stick the nose under the googly eyes.


4. Patriotic Candle Holder

If you want a more useful craft for Memorial Day, the patriotic candle holder a good option. That’s because you can use it even after the holiday. It can also serve as a decorative piece in the home. Plus, it’s affordable and easy to make.


Supplies:

  • Glass candle holders
  • Blue and red tissue paper
  • Paint brushes
  • Elmer’s glue
  • Scissors

Directions: 

  1. Mix the Elmer’s glue with water in equal amounts.
  2. Store the mixture in an airtight container.
  3. Cut the red and blue tissue paper into different shapes.
    1. Note: you can use stars, circles, or stripes in line with Memorial Day.
  4. Use the paint brushes to add a coat of the glue mixture on the outside of the glass candle holder.
  5. Decorate the glass by placing the cut shapes onto it.
  6. Wait until the shapes are slightly dry.
  7. Add a layer of glue to keep everything in place.


5. Patriotic Painted Rocks

This one’s pretty easy. It can also be a good idea for Memorial Day crafts for seniors and kids alike. The task only requires kids to paint different Memorial Day-related designs.

Thus, kids can truly get creative as they can paint flags, words, or even abstract art. It’ll look patriotic as long as they use the right colors.

Then homeowners can use the rocks to decorate their garden or living room shelves. Moreover, they can even use the rocks as centerpieces in coffee tables.


Supplies:

  • Smooth, rounded rocks
  • Blue, white, and red paint
  • Paint brushes

Directions:

  1. Wash the rocks and let them dry completely.
  2. Use the paint brushes to paint the rocks with different Memorial Day designs.


6. Patriotic Sun Catcher

What better way to honor Memorial Day than to cast the country’s national colors using a sun catcher? The kids will certainly have fun with this Memorial Day craft.


Supplies:

  • Clear contact paper
  • Red, white, and blue tissue paper

Directions:

    1. Peel a piece of clear contact paper.
    2. Place the contact paper on a flat surface with the sticky part facing upward.
    3. Tear different red, white, and blue tissues to make smaller pieces.
    4. Stick and scatter the tissues onto the clear contact paper.
    5. Peel another piece of contact paper.
    6. Stick the second contact paper on the first one, sandwiching the tissues in between.


7. Patriotic Slime

Memorial Day arts and crafts should be fun to make. Moreover, kids are sure to love this craft idea of how popular it has become.


Supplies:

  • Clear school glue
  • Red, white, and blue star confetti
  • Liquid starch

Directions: 

  1. Pour two bottles of clear school glue into a big bowl.
  2. Add ⅓ cup of liquid starch and stir the mixture.
  3. Repeat step 2 until the starch stops sticking to your fingers.
  4. Add the confetti into the mix.
  5. Knead the slime for a few minutes until it’s smooth.


Memorial Day Learning with the Kids

Memorial Day crafts are a great way to teach kids why the holiday is important. It also gives them a sense of patriotism at an early age. This way, parents can involve the entire family when honoring those who served their country.


RELATED ARTICLES:

9 Fun Easter Games For Kids

Easter is all about spending quality time with your kids, but it’s not always easy to get kids interested in activities. If you’re looking for things to do this coming holiday, here are some of the most fun Easter games for kids!


Fun Easter Games for Kids for an Unforgettable Time

While not a federal holiday, Easter is one of the most anticipated days in the spring season. In fact, 80 percent of Americans celebrate Easter. Easter, though, isn’t typically a day associated with adult activities. More often than not, it’s geared toward children. Thus, Easter is the perfect time to get kids involved and spend time with family.

Here are the best Easter games for kids.


1. Easter Egg Hunt

No Easter holiday is ever complete without the classic egg hunt. The beauty of Easter egg hunts is that you can make them as big or as small as you need them to be. It really depends on how many kids are participating and how big of a space you have to work with. You can even do an egg hunt around the house or in your backyard. Just remember to mark down where you hid the eggs for easy cleanup later on.

In terms of materials, you only really need eggs and baskets. You can use real eggs for this game and have kids collect a prize depending on how many eggs they find. Alternatively, you can also use plastic Easter eggs and fill them with candies or toys (or both). This way, everyone’s a winner. Just make sure to choose the toys carefully, as small toys can be choking hazards.


2. Egg and Spoon Race

easter Egg and Spoon RaceWho can forget the classic egg and spoon race that almost everyone played when they were younger? The mechanics of this game are easy. Participants have to balance an egg on a spoon and run to the finish line. Kids can do this individually or play in teams. For team-based play, it’s a good idea to make it a relay race instead.

If an egg falls from a spoon, that kid will have to start from the beginning. To make things more challenging, you can impose a rule that says participants need to carry the spoon using their teeth/mouth with their hands behind their backs. If you’re playing with much younger kids, simply having them carry it with their hands may be challenging enough. The fun and excitement of getting to the finish line without dropping their egg make this one of the best Easter kids games.


3. Bunny Hop Sack Race

fun easter games for kidsAt this point, sack races are like one of the traditional games for Easter for kids. To put an Easter twist to it, though, call it a bunny hop. You can even stick fluffy cotton balls at the back of the sacks to make players look like actual bunnies. Add some ears, and you’ll have cute bunnies hopping to the finish line.

You will need a large enough space for this to work, though. Having kids race in a cramped space with lots of obstacles may lead to injury. Again, kids can compete individually or in teams in a relay. Kids can hold onto their sacks, so they don’t fall off as they hippity-hop their way to the end. Play some music to make the game extra enjoyable.


4. Pin the Tail on the Bunny

It’s like “pin the tail on the donkey” but with an Easter spin. To play this game, you will need a photo of a bunny without its tail. Alternatively, you can have the kids draw this to add some creative fun to the game.

Stick the poster to the wall at a height that all the kids can reach. Then, one by one, they can come up and try to stick a cotton ball at the right spot. Of course, kids will have to do this while blindfolded to make the game fun. Whoever sticks the tail closest to the right spot wins. All the laughter that will erupt from kids placing the cotton ball in funny spots truly makes this one of the best kids games for Easter.


5. Easter Egg Toss

The Easter egg toss is pretty straightforward. Kids play this game in pairs — either with an adult or a fellow kid. Each pair gets one egg (make sure it’s raw!) to toss back and forth to each other.

To start, have the pairs stand relatively close to each other. This is the easy level. As the game progresses, have the pairs stand increasingly further apart. This will make the game harder and more interesting. It also makes for more egg drops. Continue to widen the distance until only one pair is left standing.

Because this game can get very messy, make sure everyone wears something they don’t mind dirtying up. If you don’t want to waste eggs, use water balloons instead.


6. Peeps War

Bunny hops and pin-the-tail are great, but are there any Easter games for older kids? Well, this Peeps war might do the trick. For this game, plastic eggs and marshmallow Peeps are all you need.

To play, assemble the Peeps on either side of a long table. Then, opposing players (or teams of players) can take turns knocking the other’s Peeps off the table using the plastic eggs. Whoever successfully knocks out all of the opposing Peeps first wins.


7. Easter Charades

kids games for easter If you want to tap into your kids’ performative or creative side, Easter charades is a great game to try. Simply fill a basket with Easter-related prompts you’ve written onto pieces of paper. Popular prompts include “Easter egg hunt,” “baby chicks,” and “bunnies.” Then, each person takes a turn to act out the prompt. The goal is to get the other players to guess the prompt correctly.

You can play this as a family or in teams. If you don’t want to think of prompts, there are plenty of programs online that can do it for you.


8. Freeze Dance

Dancing is a good way to get some exercise while having fun at the same time. Try incorporating it into your Easter festivities by playing a game of freeze dance. Just play Easter-themed music and have everyone dance to it. When the music stops, everyone has to freeze in place. If they move while there’s no music, they’re out. The last person standing wins the game.


9. Easter Piñata

Easter PiñataMost games are competitive by design. If you want everyone to come out a winner, an Easter piñata game is a good choice. To play this game, simply fill an Easter-themed piñata with candy and toys. Each kid comes up to take a whack at the piñata until it breaks. Then, watch as the kids scream with joy once all the candies and toys come gushing out.

Because this game does pose safety risks, make sure to have adequate adult supervision. Give the participant enough space to take a good swing at the piñata. And make sure no one steps over another or pushes each other. Because once all the goodies fall to the floor, it’s going to get crazy.


A Fun-Filled Easter Holiday

There are tons of fun Easter games for kids that don’t take much to prepare. If you want to create memories with your kids, spending time and playing games with them is a good way to do it.


RELATED ARTICLES:


5 Seafood Recipes For Valentine’s Day You Can’t Go Wrong With

Many kinds of seafood are aphrodisiacs, making them perfect for your Hearts Day meal. If you’re in the mood for something from the sea, here are the best seafood recipes for Valentine’s Day.


Looking for Seafood Recipes for Valentine’s Day? Here are 7 of the Best

Nothing beats a home cooked meal, even for Valentine’s Day. If you want to impress your date, you can’t go wrong with seafood. Here are the tastiest Valentines Day seafood recipes to try out.


1. Seafood and Chorizo Paella with Bell Peppers

Ingredients:

  • valentines day seafood recipes16 mussels
  • 1 lb large shrimp, peeled and deveined
  • 8 oz Spanish chorizo, sliced
  • 2 cups short-grain rice
  • 4 cups chicken stock
  • 1/2 cup dry white wine
  • 2 large red or yellow bell peppers, sliced
  • 1 large onion, chopped
  • 3 cloves garlic, chopped
  • 1/2 cup green olives, pitted and cracked
  • 1/2 cup flat-leaf parsley, freshly chopped
  • 4 tbsp olive oil
  • 2 tsp lemon zest
  • 6 tbsp lemon juice
  • 2 tsp saffron threads, finely crushed
  • 1 tsp smoked paprika
  • Kosher salt
  • Black pepper, freshly ground
  • Lemon wedges, for garnish


Directions:

  1. In a 12-inch cast-iron skillet, heat a tablespoon of oil over medium-high heat. Add in the shrimp and cook until browned, turning once. Transfer cooked shrimp to a plate. Turn down the heat to low. Add another tablespoon of oil to the skillet, then cook the chorizo for 1 to 2 minutes. Transfer half of the cooked chorizo to a plate.
  2. Turn up the heat to medium. Add bell peppers, onion, saffron, and the remaining oil. Season with salt and pepper. Cook for about 5 to 6 minutes. Add garlic and cook for another minute. Add paprika and rice. Stir to cook for another minute, making sure the rice is well-coated.
  3. Pour wine and cook for 30 seconds or until the wine has almost evaporated. Pour the stock in as well as 3 tablespoons of lemon juice. Simmer for 4 to 6 minutes, stirring frequently. Turn down the heat and put a lid on the skillet. Let it simmer for another 18 to 20 minutes or until the rice absorbs most of the liquid.
  4. Add shrimp and mussels. Place the lid back on and let it cook until the mussels open and the shrimp becomes opaque.
  5. Remove the skillet from the heat and stir in the olives, reserved chorizo, and 3 tablespoons of lemon juice. Allow to stand for 5 minutes. Top with parsley and lemon zest. Garnish with lemon wedges.


2. Roasted Oysters with Garlic-Parsley Butter

Oysters are a known aphrodisiac, making it a popular ingredient for seafood recipes for Valentine’s Day.

Ingredients:

  • For the garlic-parsley butter:
    • 1 stick unsalted butter, softened
    • 1/4 cup fresh parsley, roughly chopped
    • 2 tbsp shallots, minced
    • 1 1/2 tsp lemon zest, grated
    • 1 tbsp roasted garlic
    • Kosher salt
    • Black pepper, freshly ground
  • For the oysters:
    • 24 oysters (in the shell)
    • 1 baguette, cut into half-inch slices


Directions:

  1. Preheat the oven to 375°F.
  2. In a food processor, add the butter, shallots, roasted garlic, parsley, lemon zest, salt, and pepper. Blend into a smooth puree.
  3. Shuck the oysters to open the shells. Line the baking dishes with baguette slices. Top with shucked oysters.
  4. Spoon the garlic-parsley butter over each oyster. Bake in the oven for 8 to 10 minutes. Serve immediately.


3. Lobster Risotto

Ingredients:

  • valentine's day fish recipes6 cup seafood or lobster stock
  • 6 oz cooked lobster meat, chopped
  • 4 tbsp unsalted butter
  • 6 oz cherry tomatoes, halved
  • 2 oz grated Parmesan, plus more for serving
  • 1 1/2 cup arborio, vialone nano, or carnaroli rice
  • 1 cup dry white wine
  • 2 cloves garlic, sliced
  • 1 large shallot, finely chopped
  • 1/4 cup mascarpone
  • 2 tbsp chives, finely chopped
  • 1 tsp lemon zest, finely grated
  • Kosher salt
  • Pinch of crushed red pepper flakes (optional)


Directions:

  1. Heat the stock in a small saucepan over medium-low heat. Keep warm with a lid.
  2. Melt 2 tablespoons of butter in a large skillet over medium-high heat. Add tomatoes and 1/2 teaspoon of salt. Cook until the tomatoes burst. Add shallot, garlic, and 1/4 teaspoon salt. Cook for another 2 minutes, stirring every now and then.
  3. In the same skillet, add 1 tablespoon of butter. Stir until melted. Pour in the rice and turn down the heat to medium. Stir the rice to toast for about 2 to 3 minutes until the rice starts sticking to the bottom. Pour in the wine and cook for another 2 minutes until the liquid evaporates.
  4. Gently pour 4 oz of warm broth into the rice. Stir frequently until the rice absorbs the liquid completely. Repeat this step, adding 4 oz of broth at a time. After 30 minutes, there should be 4 oz of broth left. At this point, the rice should be cooked fully.
  5. Remove the pot from the heat and add Parmesan, the remaining broth, mascarpone, the remaining butter, and 1 teaspoon salt. Add the lobster meat, chives, and lemon zest. Fold in red pepper flakes if desired.
  6. Transfer the cooked risotto into bowls and garnish with more Parmesan and chives before serving.


4. Linguine with Shrimp and Garlic Cream Sauce

Ingredients:

  • seafood recipes for valentine's day12 large shrimp, peeled and deveined
  • 8 oz linguine
  • 8 cloves garlic, unpeeled
  • 1 1/2 cups heavy cream
  • 1/2 cup Parmesan, grated
  • 2 tbsp olive oil
  • 1/4 cup fresh parsley, finely chopped
  • Kosher salt
  • Black pepper, freshly ground


Directions:

  1. Cook pasta according to the directions on the package. Drain the water and set aside.
  2. In a large saucepan, boil 6 cups of water. Add the garlic into the boiling water and let it cook for 2 minutes. Add the shrimp and let it cook for another 2 to 3 minutes. Drain the water. Peel the garlic and chop it into fine pieces.
  3. In a large skillet over medium heat, add oil and let it heat up. Add the garlic and cook for 1 minute. Pour the heavy cream and bring it to a simmer. Let it simmer, stirring every now and then, until it thickens. Add the Parmesan, shrimp, and parsley. Season with salt and pepper to taste.
  4. In a large bowl, combine the sauce and the cooked linguine. Toss to coat the pasta completely.
  5. Garnish with Parmesan and parsley before serving.


5. Roasted Cod with Olives and Lemon

If you’re looking for Valentine’s Day fish recipes, this roasted cod dish will surely satisfy.

Ingredients:

  • 6 cod fillets
  • 20 green olives, stuffed with pimento
  • 18 small red potatoes
  • 8 sprig thyme
  • 3 small lemons, thinly sliced
  • 2 tbsp olive oil
  • 1/2 tsp sea salt
  • 1/4 tsp black pepper, freshly ground


Directions:

  1. Preheat the oven to 450°F. On a large baking sheet, arrange the lemon slices in a single layer. Place the thyme sprigs on top and sprinkle the olives.
  2. Cut each potato in half before placing it in a large, microwave-safe bowl filled with water. Make sure the potatoes are completely submerged. Microwave for about 10 minutes or until the potatoes are fork-tender. Drain the water and arrange the potatoes around the edge of the baking sheet.
  3. Lay the cod fillets over the lemon slices. Drizzle olive oil over the top of the fish and potatoes. Season with salt and pepper.
  4. Place the baking sheet in the oven. Reduce the temperature to 325°F. Bake for about 25 minutes or until cooked.
  5. Serve with potatoes and a side of olives.


Have a Happy Valentine’s Day!

There’s nothing like a good seafood dinner to make Hearts Day extra magical. And who says you have to be an experienced chef to pull off a delicious dish? These seafood recipes for Valentine’s Day are easy to follow and will certainly put a smile on your date’s face.


RELATED ARTICLES:


5 Crafty Homemade Christmas Gifts For Your Loved Ones

With Christmas just around the corner, people are scrambling to get their holiday shopping done. If you’re sick and tired of the usual gifts, though, why not try your hand at these homemade Christmas gifts?


Homemade Christmas Gifts That Will Show You Care

There is nothing wrong with buying Christmas presents for your friends and family. But, if you want to go that extra mile and show your loved ones you truly appreciate them, putting in your time and effort is the way to go. Roll up your sleeves and prepare to use some elbow grease on these homemade Christmas gifts.


1. Citrus Marmalade

Nothing says homemade gift for Christmas like a delicious marmalade you make in your own kitchen. Here’s a recipe that will surely impress.

Ingredients:

  • easy diy christmas gifts4 large naval oranges, divided
  • 2 medium grapefruit
  • 2 limes
  • 5 cups granulated sugar
  • 2 star anise
  • 1 pouch (3 oz) liquid pectin
  • 1 1-inch piece ginger, smashed
  • 1/8 tsp baking soda


Directions:

  1. Peel two oranges, the grapefruit, and the limes. Set aside. Cut the peels into thin strips.
  2. In a large Dutch oven over medium heat, pour 1 1/2 cups of water. Add in the peels and baking soda. Bring to a simmer and then lower the heat. Simmer for 18 to 20 minutes with the lid on.
  3. Peel the remaining oranges. Remove the white pith from all of the peeled oranges as well as the grapefruit. Separate the fruit into sections, removing the membranes and seeds. Chop the fruit and place in a bowl.
  4. Add the fruit, juice, ginger, and star anise to the Dutch oven. Simmer for another 15 minutes with the lid on. Add sugar and turn up the heat to high. Bring to a rolling boil before adding pectin. Boil again for about 10 to 15 minutes or until a candy thermometer reads 220°F.
  5. Turn off the heat. Remove the foam that forms on the surface. Remove the ginger and star anise.
  6. Transfer the cooked marmalade into small jars and allow to cool completely before screwing in the lids. Place in the refrigerator to chill before giving out as gifts.


2. Santa Slime

If you can’t think of easy DIY Christmas gifts, this holiday slime is something you can make with common household items. It’s especially perfect for kids but works for all ages.

Materials:

  • 4 cups unscented shaving cream
  • Red glitter glue
  • 1/4 cup water
  • 2 tbsp contact solution
  • Liquid red food coloring
  • 1/2 tsp baking soda


Directions:

  1. In a bowl, pour in the bottle of red glitter glue. Add water to the same bowl. This will make the slime stretchier.
  2. Add the baking soda and mix well. Add the shaving cream and mix again.
  3. To make the color deeper, add the red food coloring using a spoon. Add a little at a time until the slime turns into the shade you want. Mix well.
  4. Gradually add the contact solution and mix slowly. Add only a teaspoon at a time and knead. Stop when you have reached the consistency you want. Good slime is not too sticky.
  5. Add the finished slime into a jar. Decorate the jar (a popular choice is to dress it like Santa).


3. Pine-Scented Candle

If you’re looking for DIY Christmas gifts for coworkers, this pine-scented candle is easy to make and smells good, to boot.

Materials:

  • diy christmas gifts for momWeck jars
  • 10 cups soy wax chips
  • Green dye
  • Pine-scented candle oil
  • Candle wicks
  • Small wooden sticks


Directions:

  1. Place the soy wax chips in a heavy pot. Melt it over medium heat. Once melted, add drops of pine-scented candle oil and mix well. Pour the melted wax into two heat-proof bowls (the bowls should have pouring spouts to make it easier). Divide it evenly between the bowls.
  2. Add drops of green dye into one of the melted wax bowls. Use just enough to get the shade of green you want.
  3. Place the wick at the bottom of the candle jar. The wick might move around, so you can glue the wick to the bottom to secure it. Alternatively, you can wrap the top of the wick around a twig or stick. Place the twig or stick on the rim of the jar. This will keep it in place.
  4. Pour the melted white wax into the jar. Let it dry. You can place it in the refrigerator so it can dry faster. Then, pour the melted green wax on top of the dried white layer. Repeat this step until you have filled the jar. You can do as many layers as you want and as thick as you want each layer to be.
  5. Remove the stick and cut the wick to the appropriate height. Pop the lids on.
  6. Optional: wrap in gift wrapper before handing them out to recipients.


4. Snow Globes

Materials:

  • Glass jars with screw-on lids
  • Distilled water
  • Glycerin
  • Epoxy
  • Plastic or ceramic figurines
  • Tinsel glitter
  • Sandpaper


Directions:

  1. Clean all of the jars and dry them thoroughly. Wipe the jars using a lint-free cloth to remove any fingerprints or smudges.
  2. Sand down the underside of the lids. Then, take your figurine of choice and glue it to the underside of the lid using epoxy. Complete with the rest of the lids. Let them dry completely.
  3. Pour distilled water into the jars. Make sure not to overfill the jar so that the figurines still have room.
  4. Add a small drop of glycerin to each filled jar. The glycerin will help suspend the glitter to give you that snowy effect.
  5. Add the tinsel glitter to the jars. Make sure not to add just enough to achieve that snowy effect while still keeping the figurine visible.
  6. Screw on the lids with the attached figurines so that the figurines are inside the jars. Close the lids tightly. This way, no water or glitter will escape the jar when you shake it.


5. Bubble Bars

When it comes to DIY Christmas gifts for mom, these bubble bars are a sure winner.


Ingredients:

  • 1 cup baking soda
  • 1 cup sodium lauryl sulfoacetate
  • 1/3 cup corn starch
  • 1/3 cup vegetable glycerin
  • 1 tbsp coconut oil
  • 1/3 cup cream of tartar
  • 1 tbsp water
  • 20-30 drops any essential oil
  • Natural soap dye


Directions:

  1. Strain all of the dry ingredients through a fine mesh sieve. Combine them all in a bowl and mix thoroughly.
  2. In a separate bowl, pour all the wet ingredients in, including the essential oils.
  3. Pour the wet ingredients into the bowl with the dry ingredients. Use your hands to mix them until it reaches a crumbly consistency.
  4. Divide the soap dough into two and place them in different bowls. Add one color soap dye to one bowl and another to the other bowl. Combine well so that it colors evenly.
  5. Transfer one bowl of dough to parchment paper. Shape it into a vertical rectangle, flattening it to ensure an even surface (about 1/2-inch thick). It should have no cracks or gaps.
  6. Transfer the second bowl of the dough on top of the flattened rectangle. Flatten it again so that you have two layers of different colors.
  7. Grab two edges of the parchment paper and lift. Then, start rolling the soap dough in on itself as if you were making a cake roll, pressing together any cracks that form along the way.
  8. Slice the soap roll into 1- to 2-inch thick pieces. Make sure to do this with a gentle hand so that the soap retains its shape.
  9. Line the slices up on parchment paper or a tray. Let dry for 72 hours.


Happy Gift Giving!

Homemade Christmas gifts are the best kinds of gifts. They show your loved ones that you care about them enough to put in the time and work. Plus, hand-crafted gifts are always great when you’re in a pinch or on a budget.


RELATED ARTICLES:


5 Thanksgiving Dessert Recipes To Satisfy The Sweet Tooth

Dessert is the best part of any meal. If you want to wow your guests this holiday, here are the most delectable Thanksgiving dessert recipes.


Mouthwatering Thanksgiving Dessert Recipes for the Holiday

Eating something sweet is the best way to end a savory dinner. But, what is a good dessert to top off a Thanksgiving meal? Below, you will find the tastiest Thanksgiving dessert recipes to try this holiday.


1. Pecan Pie Brownies

Ingredients:

  • 2 1/2 cup whole or chopped pecans
  • 1 (18 oz) box brownie mix
  • 2 large eggs
  • 3/4 cup packed brown sugar
  • 1/3 cup maple syrup
  • 4 tbsp butter, melted
  • 2 tsp pure vanilla extract
  • 1/2 tsp Kosher salt
  • Cooking spray


Directions:

  1. Preheat the oven to 350°F. Spray a baking pan (9×13 inches) with cooking spray before lining it with parchment paper. Grease the parchment with cooking spray as well.
  2. Prepare brownie batter according to the instructions on the box. Pour the batter into the baking pan. Bake according to the instructions or until a toothpick comes out clean. Don’t turn the oven off.
  3. Whisk together melted butter, brown sugar, vanilla, maple syrup, and salt in a separate bowl. Add eggs and whisk until combined. Fold in pecans until well-coated.
  4. Top baked brownies with the pecan butter mixture in an even layer. Place back in the oven to bake for about 20 minutes or until the top layer has set.
  5. Remove from the oven and allow to cool completely. Slice into desired sizes and serve.


2. Pumpkin Pie Cupcakes

Pumpkin Pie CupcakesLooking for Thanksgiving recipes for desserts? Here’s one that combines two desserts into one.

Ingredients:

  • For the cupcakes:
    • 1 (15 oz) can pure pumpkin puree
    • 1 3/4 cups cake flour
    • 2 large eggs
    • 1 cup granulated sugar
    • 2 tsp pumpkin pie spice
    • 1 1/2 sticks (12 tbsp) unsalted butter, melted
    • 1/4 cup milk
    • 2 tsp pure vanilla extract
    • 1 1/2 tsp baking powder
    • 1/2 tsp fine salt
    • Cooking spray
  • For the pie crust cutouts:
    • Half a rolled pie crust (store-bought or homemade)
    • 2 tbsp milk
    • Granulated sugar
  • For the filling:
    • 4 oz cream cheese, room temperature
    • 2 cups heavy cream
    • 3/4 cup powdered sugar


Directions for the cupcakes:

  1. Preheat the oven to 350°F. Place liners into a cupcake tin and spray with cooking spray.
  2. Whisk together the pumpkin pie spice, baking powder, flour, and salt in a large bowl.
  3. In a separate bowl, whisk together the pumpkin puree, butter, sugar, eggs, vanilla, and milk.
  4. Pour the pumpkin puree mixture into the flour mixture. Fold until just incorporated.
  5. Scoop the cupcake batter into the lined cupcake tray. Bake for 24 to 28 minutes, rotating the pan halfway through the process.
  6. Remove from the oven and allow to cool for a few minutes before transferring to a rack to cool through.
  7. For the pie crust cutouts:
  8. Line a baking sheet with parchment paper.
  9. Cut out 12 shapes from the rolled pie crust and place them on the baking sheet. Brush the tops with milk before sprinkling granulated sugar.
  10. Bake in the oven for 10 to 15 minutes or until golden brown, rotating the baking sheet halfway through to cook evenly.
  11. Remove from the oven and allow to cool completely.


Directions for the filling:

  1. In a bowl, beat together the cream cheese and powdered sugar. Pour in 1 cup of the cream and beat until soft peaks form. Pour in the remaining cream and beat until stiff peaks form. Transfer the filling to a pastry bag.


Directions for the assembly:

  1. Using a melon baller or teaspoon, scoop out a small portion of the top of each cupcake. Set the scooped-out pieces aside.
  2. Fill each hole with the cream cheese filling just enough before placing the scooped-out piece back on top.
  3. Ice the top of each prepared cupcake using a swirl pattern. If preferred, refrigerate the cupcakes for up to 2 hours.
  4. Top each cupcake with a pie crust cutout before serving.


3. Pumpkin Roll

Pumpkin Roll

Ingredients:

  • 2 (3 oz each) packages cream cheese, room temperature
  • 3 large eggs
  • 1 cup pecans, finely chopped
  • 2/3 cup canned pumpkin
  • 1 cup powdered sugar, plus more for sprinkling
  • 3/4 cup all-purpose flour
  • 1 cup granulated sugar
  • 1 stick butter (1/2 cup), room temperature
  • 1/2 tsp vanilla extract
  • 2 tsp ground cinnamon
  • 1 tsp lemon juice
  • 1 tsp ground ginger
  • 1/2 tsp salt
  • 1 tsp baking powder


Directions:

  1. Preheat the oven to 350°F. Grease a jelly roll pan (17 1/2 x 12 1/2 inches) and sprinkle flour into the pan.
  2. Sift the flour, ginger, salt, baking powder, and cinnamon.
  3. Beat the eggs, sugar, pumpkin, and lemon juice using a hand or stand mixer.
  4. Add the sifted flour mixture to the egg mixture. Beat until combined.
  5. Pour the batter into the jelly roll pan. Top with chopped pecans.
  6. Bake for about 14 minutes or until a toothpick comes out clean. Remove from the oven and allow it to cool for 5 minutes. Once cool enough, invert the cake onto a wire rack.
  7. Sprinkle powdered sugar on a large tea towel. Gently transfer the cake to the towel. Fold the sides of the towel over the cake and begin to roll the cake in the towel. Place in the refrigerator to cool for 45 minutes.
  8. In a bowl, beat together cream cheese, powdered sugar, butter, and vanilla.
  9. Take the cooled cake from the refrigerator and carefully unroll it. Spread the cream cheese mixture on top before re-rolling the cake carefully.
  10. Dust with powdered sugar before serving.


4. Apple Hand Pies

For a twist on the classic apple pie, here’s one of the best Thanksgiving dessert recipes.

Ingredients:

  • For the crust:
    • 3 cups all-purpose flour
    • 1 cup (2 sticks) cold butter, cut into 1/2″ pieces
    • 8 tbsp ice water
    • 3 tbsp granulated sugar
    • 1 tbsp apple cider vinegar
    • 1/2 tsp kosher salt
  • For the filling:
    • 3 large tart apples (about 1 3/4 lb), cored, peeled, and cut into 1/2-inch pieces
    • 1 tbsp butter
    • 1/3 cup granulated sugar
    • 1/4 cup apple butter
    • 2 tbsp fresh lemon juice
    • 1 tbsp cornstarch or 2 tbsp. all-purpose flour
    • 1 tsp pure vanilla extract
    • 1/8 tsp kosher salt
  • For the assembly:
    • 1 large egg
    • All-purpose flour, for rolling
    • Turbinado sugar, for sprinkling
    • 1 tbsp water
    • Pinch of kosher salt
    • Vanilla ice cream, for serving (optional)


Directions for the crust:

  1. Whisk together flour, sugar, and salt in a large bowl. Add the butter pieces and mix in with the flour using your hands. Pour vinegar then ice water, working 1 tbsp at a time. Mix together until a rough dough forms. The dough should be moist (but not wet) and a little crumbly in texture.
  2. Lightly flour your work surface. Turn out the rough dough onto the surface and divide into two. Using a rolling pin, carefully flatten each dough ball into disks, avoiding cracking. Cover with plastic wrap and place in the refrigerator for at least 2 hours (up to overnight).


Directions for the filling:

  1. Melt butter in a skillet over medium heat. Cook the apples, sugar, apple butter, vanilla, and salt until the apples start to soften.
  2. Whisk together lemon juice and cornstarch in a small bowl. Add to the skillet and stir. Simmer for about 1 minute or until the mixture thickens slightly, making sure to stir every now and then.
  3. Transfer the filling to a separate bowl. Cover and place in the refrigerator for at least 30 minutes (up to overnight).


Directions for assembly:

  1. Preheat the oven to 400°F. Line a large baking sheet with parchment paper.
  2. Take out the dough from the refrigerator and let it sit at room temperature for 5 to 10 minutes.
  3. Whisk together egg, water, and salt in a small bowl.
  4. Lightly flour your work surface. Take the dough and roll each one into a 16-inch round disk. Cut out 6-inch circles from each disk.
  5. Place around 1/3 cup of filling onto each circle, making sure to leave at least an inch of border.
  6. Brush the edges with egg wash before folding them over the filling. It should look like a half-moon. Using a fork, seal the edges.
  7. Place the prepared hand pies on the lined baking sheet. Brush the tops with egg wash before cutting slits into each one to allow the steam to escape. Sprinkle the top with sugar and freeze for 20 minutes.
  8. Bake the pies in the oven for 30 to 35 minutes or until the crust is golden. Let cool slightly before serving, ice cream is optional.


5. No-Bake Pumpkin Cheesecake

No-Bake Pumpkin CheesecakeThe best dessert recipes for Thanksgiving are the ones that don’t need an oven.

Ingredients:

  • For the crust:
    • 1 1/2 cup finely crushed gingersnaps
    • 5 tbsp butter, melted
    • 2 tbsp granulated sugar
  • For the filling:
    • 1 (15 oz) can pumpkin puree
    • 2 (8 oz) blocks cream cheese, softened
    • 1 cup heavy cream
    • 1 tsp pure vanilla extract
    • 1/2 tsp ground nutmeg
    • 1 cup powdered sugar
    • 1 tsp cinnamon
    • 1/4 tsp kosher salt
  • For the topping:
    • Whipped cream
    • Roughly crushed gingersnaps


Directions for the crust:

  1. Mix crushed gingersnaps, melted butter, and sugar in a bowl. It should look like wet sand.
  2. Line an 8-inch springform pan with the crust mixture, patting it down so that it is all in an even layer.


Directions for the filling:

  1. In a bowl, beat heavy cream until stiff peaks form.
  2. Beat cream cheese until soft in a separate bowl. Put in pumpkin puree and powdered sugar and beat again until lumps disappear.
  3. Pour in vanilla, cinnamon, nutmeg, and salt. Mix until incorporated. Fold in the whipped cream until just combined.


Directions for the assembly:

  1. Pour the batter over the prepared crust. Smooth out the top using an offset spatula.
  2. Place in the refrigerator for at least 4 hours (up to overnight) to set.
  3. Top with whipped cream and crushed gingersnaps before serving.


Happy Thanksgiving!

As you can see, there are several Thanksgiving dessert recipes you can put to good use this holiday. Some of them require more work than others, so there’s a dessert for every skill level. Whatever you choose, though, your guests will surely appreciate the tasty treat!


RELATED ARTICLES:


7 Columbus Day Recipes For A Great Holiday Meal

Columbus Day is a good time to relax and indulge in hearty meals. Whether you want to cook for a group or just yourself, these Columbus Day recipes will surely leave you wanting more.


Awesome Columbus Day Recipes to Try This Holiday

Columbus Day does not get the same amount of attention as other federal holidays. While most restaurants remain open during this day, it is still a great time to practice your cooking skills and enjoy home-cooked meals. Here are some delicious Columbus Day recipes you can try over the three-day weekend.


1. Buttermilk Cornbread

Ingredients:

  • 2 cups buttermilk
  • 2 cups self-rising corn meal mix or white corn meal
  • 1/2 cup flour
  • 6 tbsp shortening or lard (plus an additional tbsp for greasing the pan)
  • 1 tsp salt

Instructions:

  1. Preheat the oven to 425°F and place a 12-inch cast iron skillet inside.
  2. Heat the lard or shortening in a small pan over medium heat, removing when melted.
  3. In a separate bowl, combine the buttermilk and salt. Mix in the flour and corn meal in batches, alternating between each one.
  4. Pour the melted lard or shortening into the batter, combining until smooth.
  5. Remove the heated cast iron skillet from the oven and grease it with the remaining lard up to the sides. Place it back into the oven to melt.
  6. Remove the skillet once again and pour in the batter. Bake for 30 to 40 minutes until golden brown and a toothpick comes out clean.
  7. Cut the cornbread into pieces before serving with butter (optional).


2. Bruschetta

If you’re looking for some Columbus Day Italian recipes, bruschetta is an easy one to prepare.

Ingredients:

columbus day italian recipes

  • 1 french baguette
  • 1 large tomato, largely grated
  • 2 tbsp black truffle oil
  • 1 black truffle, shaved into thin slices
  • 1 garlic clove, finely grated
  • Truffle salt
  • Pepper to taste

Directions:

  1. Slice the baguette at a diagonal angle into 1/2-inch slices. Let them toast in the oven.
  2. In a bowl, combine the tomato, garlic, truffle oil, truffle salt, and pepper.
  3. Remove the toasted bread from the oven and spread the tomato mix over the top. Garnish with shaved truffle and serve.


3. Frittata

Ingredients:

  • italian recipes for columbus day1 cup mozzarella cheese, shredded
  • 1/2 cup salami, diced
  • 1/2 cup cherry tomatoes, chopped
  • 1 can mushroom, sliced and drained
  • 1/2 cup artichoke hearts, chopped and drained
  • 6 eggs
  • 1/3 cup milk
  • 1/3 cup parmesan cheese, grated
  • 1 garlic clove, minced
  • 1 tsp dried basil
  • 2 green onions, chopped
  • 1 tsp onion powder
  • 1 tsp salt
  • Black pepper to taste

Directions:

  1. Preheat the oven to 425°F.
  2. In a skillet, cook the salami, tomatoes, artichokes, and mushrooms over medium heat. Grease a shallow 2-quart baking dish and transfer the cooked salami mixture.
  3. In a bowl, whisk together the milk, eggs, green onions, garlic, onion powder, dried basil, salt, and black pepper. Pour the mixture into the baking dish as well.
  4. Top the dish with mozzarella and parmesan cheese before baking in the oven for 20 minutes or until set.


4. Spanish Rice

A lot of people like to prepare Spanish recipes for Columbus Day. Here’s one that’s both easy and delicious.

Ingredients:

  • 2 cups chicken broth
  • 1 1/2 cups uncooked white rice
  • 1 cup chunky salsa
  • 2 tbsp onion, chopped
  • 2 tbsp oil

Directions:

  • In a large skillet, heat the oil over medium heat. Add the onion and cook until soft.
  • Pour the white rice into the skillet and stir frequently. Once the rice starts to brown, pour in the chicken broth and salsa.
  • Switch to low heat and simmer the rice, making sure to cover the skillet. Allow it to cook until the rice absorbs the liquid, about 20 minutes.


5. Pumpkin Gnocchi

Italian recipes for Columbus Day are quite popular, and gnocchi is a classic Italian dish. Instead of using the classic potato, this one swaps it out for pumpkin — perfect for the fall season.

Ingredients:

  • spanish recipes for columbus day1 1/2 cups pumpkin, cubed
  • 1 1/2 cups all-purpose flour, plus 1/3 cup for kneading
  • 1/3 cup Grana Padano cheese, finely grated
  • 1/4 cup sage leaves
  • 1 egg yolk
  • 5 tbsp butter
  • 1 tbsp extra virgin olive oil
  • 2 tsp salt
  • 1/4 tsp nutmeg
  • Salt and pepper to taste

Directions:

  1. Preheat the oven to 350°F.
  2. Combine the pumpkin with olive oil, salt, and pepper in a bowl, making sure the pumpkin is coated. Place the pumpkin cubes on a baking sheet. Bake for 15 to 20 minutes, until the pumpkin takes on a golden brown color and is tender.
  3. After baking, remove the pumpkin from the oven and allow it to cool until warm. Then, transfer it to a food processor and puree.
  4. Combine the pumpkin puree with the cheese, egg yolk, and nutmeg in a bowl. Slowly pour in the flour and mix until it forms a dough.
  5. Flour the surface and knead the dough until soft. Cut it into equal pieces and roll each one into ropes about 1/2-inch thick.
  6. Cup each rope further into small pillow-like pieces about 1/2-inch wide. Shape each piece into the classic gnocchi shape using a fork dipped in flour.
  7. Boil a pot of salted water and add the gnocchi a few pieces at a time. Stir the pot every now and then to make sure they don’t stick together.
  8. Wait for the gnocchi to float and rise to the surface. When that happens, allow it to cook for another 30 seconds before removing it with a slotted spoon.
  9. Melt butter in a large saucepan before adding sage leaves. Let this cook for about 30 seconds or until fragrant. Toss in the gnocchi until well-coated.
  10. Grate some cheese on top before serving.


6. Scallop Risotto

Scallop risotto may seem like a lot of work, but it’s actually easier than you think. Indulge in this delicious Columbus Day recipe this coming holiday.

Ingredients:

  • columbus day recipes2 cups Arborio rice
  • 1/2 onion, chopped
  • 1/2 cup truffle cheese, grated
  • 4 cups chicken stock
  • 1/2 cup Parmigiano Reggiano cheese, grated
  • 2 tbsp truffle butter
  • 1 cup heavy cream
  • Truffle oil
  • Truffle salt
  • 20 scallops
  • 2 tbsp olive oil
  • Fresh black truffle, grated (for garnish)

Directions:

  1. Heat a pan over medium heat and add in the butter until melted. Saute the onions in the melted butter until tender.
  2. Add the Arborio rice and stir in with the onions, cooking for about 2 minutes.
  3. Pour in the chicken stock and heavy cream. Cook and stir using a wooden spoon until it begins thickening.
  4. Turn off the heat and add in the butter and grated truffle cheese. Allow it to incorporate before adding in truffle oil.
  5. Add in the Parmigiano Reggiano cheese and fresh truffle as the risotto finishes cooking.
  6. In a separate pan, heat the olive oil over medium heat. Cook the scallops in the pan, making sure to space them out about 1 inch apart. Allow the scallops to cook for about 1-2 minutes on each side.
  7. Transfer the cooked risotto to a place and drizzle truffle oil on top. Add in a few of the scallops and garnish with shaved black truffle before serving.

7. Panna Cotta

No meal is complete without dessert. As one of the easiest Columbus Day dessert recipes, this panna cotta will surely satisfy your taste buds.

Ingredients:

recipes for columbus day

  • 8 ounces raspberries, fresh or frozen, plus another 6 ounces for garnish
  • 8 ounces raspberry preserves or raspberry jam
  • 7 ounces white chocolate, chopped
  • 2 1/2 cups heavy cream
  • 3/4 cup white sugar
  • 1/4 cup water
  • 2 tsp powdered gelatin, unflavored
  • Fresh mint

Directions:

  1. Puree 8 ounces of raspberries. Combine the puree with the jam or preserves. Divide the puree mixture into two.
  2. At the bottom of six small glasses, spread the first half of the puree mixture. Place the glasses in the fridge while you work on the other part of the recipe.
  3. Combine the powdered gelatin with water in a bowl. Set aside.
  4. Place the white chocolate in a separate bowl. Pour the heavy cream into a saucepan and heat it until it just begins to boil. Then, pour it over the white chocolate. Mix until the chocolate melts completely.
  5. Add in the gelatin and sugar, combining well. Allow the mixture to cool down until it becomes thick and creamy.
  6. Take out the glasses from the fridge and slowly pour the white chocolate mixture over each one. This will create a layer of white chocolate on top of the raspberry puree layer. Place the glasses back in the fridge to let the panna cotta firm up.
  7. Once firm, take the other half of the raspberry puree and distribute it among the glasses. This will create three layers, with the white chocolate sandwiched between the raspberry puree layers. Refrigerate once more.
  8. Remove the panna cotta from the fridge once firm. Garnish with the extra raspberries and mint leaves before serving.


A Recipe for Everyone

As you can see, there are a number of Columbus Day recipes you can try this coming holiday. And while some of them require time and work, others are simple enough to not mess up even on your first try.


RELATED ARTICLES:


LIVE CHAT